Monday, November 9, 2009

Thank you Blog World

My friend and I held a baby shower at my house this past weekend and it turned out really nice.  I need to give credit where credit is due because the gift, prizes, and decor ideas all came from the blogging world.  Here is what we did:

The gift I gave her was Lil Blue Boo's "ABC Beanbags"


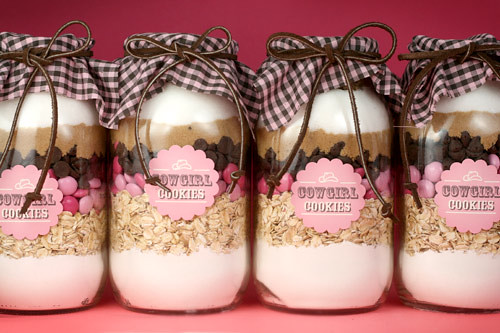
Our prize for our game was Bakerella's "Cowgirl Cookie Jars" (we labeled them with a baby girl theme vs. a cowgirl theme).  We also made a patch and they were extremely yummy.


Some of our decor came from Martha's Pom-Pom tutorial.  We made mini pom-pom's and put them in vases.  


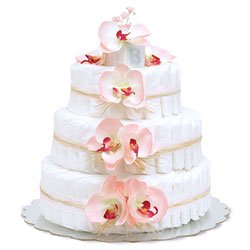
And finally we made a couple diaper cake center pieces.  See a video tutorial here:


 Hope these idea's help if anyone is throwing a shower soon.  These projects were fun and simple.  Thanks to all the creative women out there for suppling the tutorials!

Saturday, November 7, 2009

Lomography


So I really wanted to find a new hobby because I can't play sports as much as I would like nowadays.  After doing some research I found a new interest called lomography.  Now what is lomography you may ask.  Good question--i'm still not quite sure how to describe it.  It's a type of photography that uses 35mm film.  There is not a screen on the camera to view the photo you've taken so you never know what your going to get.  Some may find that exciting.  Here are some pictures that i've taken with my Diana F+ camera that I really enjoyed.  I'm still trying to figure out how to use my camera and everything but it's a new hobby and that is exactly what I was looking for.  If you want to learn more about lomography click here.

Sincerely,
       "Miss That"


Friday, November 6, 2009

Grandmother's Doily


Good day:) It's Ms. That again with a inspirational vintage design.  My grandmother has given me dozens of old doily's that belonged to her and her sisters that have now passed on and I haven't really decided what I want to do with them yet.  I wanted to do something a little different and I finally found the perfect idea from Urban Outfitters.  So if you have some extra doily's lying around your house and want to create something beautiful, then here is your ticket.  If you don't have any doily's and still want to create this design, then try going to your local dollar store.  I found some there that will work great with my grandmothers. Enjoy!


Sincerely,
     "Ms. That"


Wednesday, November 4, 2009

We Love Amy Butler!


Well hello.  It's "Ms. That" with an inspirational design from the fabulous Amy Butler.  She has created some gum drop pillows that can go just about anywhere in your home.  They can go in your child's playroom to bounce on or in your living room to rest your hard working feet on.  You can get this wonderful gum drop pillow pattern on Amy's website.  You will also be able to find free patterns on her site as well.  Good luck!

Sincerely,
       "Ms. That"

Thursday, October 29, 2009

Sew Love Fabrics


I just received this fabric in the mail today and I can't stop looking at it.  I love the colors and the funky design.  I bought the fabric off of Etsy from Sew Love Fabrics.  Their service was great and I'm sure I'll be purchasing more fabric in the near future.  Now my only wish would be that this project along with this project was complete.

Wednesday, October 28, 2009

Denyse Schmidt Cards


Denyse Schmidt has changed my views on quilting.  I don't know why but every time I thought of quilts I thought "thats what old ladies do" and just assumed that when I was older I would take up the hobby.  After looking at her book I wanted to start quilting and preferably before I was an old lady!  Her design and color combinations are really inspiring.  This book has some great projects in it one of which this tutorial stemmed from.  I first saw Denyse's quilted cards on MADE and after I looked at Dana's tutorial along with Denyse original project I thought it would be fun to have quilted shaped cards for the different holidays.  So here is my attempt at "this and that's" first tutorial.

Materials Needed:  scraps of fabric
                               cardstock
                               thread
                               sewing machine
                               scissors

Step One:  Create the shape of cards you want to create or just download any of my "egg", "tree", or "heart" shaped card at the bottom of this post.  When cutting out my downloads make sure you cut on the inside of the black lines so they don't show on the finished card.


Step Two:  Pick out your fabric


Step Three:  Place fabric on front of card in the desire you want it arranged.  Cover cards completely and make sure fabric is extended past cardstock.  They will look like this...


Step Four:  You have to sew on each piece individually.  I took the bottom piece in my design and carefully slide off the other scraps to the side so my chosen combination wouldn't be lost.  Take that first piece and sew it directly onto the paper forming zig-zags.  Take the next piece and do the same.  Continue to do so until the whole card is covered.  I found that it looks best if you do the zig-zags on each strip then when the whole card is covered stitch an outline of the card shape.  The back should look like this:


Step Five: Cut off excess.


Step 6:  Your done!


Here's a completed Easter egg card with ric-rac


If you want to look at MADE's tutorial click here.  I made these after reading her tutorial


Tips on download:  *you will have to create an account on Scribd to download these files.  It's quick, easy and worth it!
*when you print these files make sure your printer is set on 8 1/2 x 11 paper size.  For some reason my settings would change when I went to print the file.  I'm sure it's an easy fix but I am not computer savvy.

Easter Egg Card

Tree Cards

Heart Cards 1

Sincerely,
"Ms. This"


Monday, October 26, 2009

Comfy Cozy


I was really excited when I found this free pattern from Spool Sewing.  I hated putting the ugly plastic cover over my sewing machine.  It just didn't make for great eye candy.  So I finally trashed the plastic cover and replaced it with cover.  Click here for the direct link to the cover pattern and visit Spool Sewing for some more goodness.  


Hope you enjoy! 
Sincerely,
"Ms. This"